If you need to regulate humidity, probably thinking about buying humidity controller -Hygrostat. This article describes device MH-13001
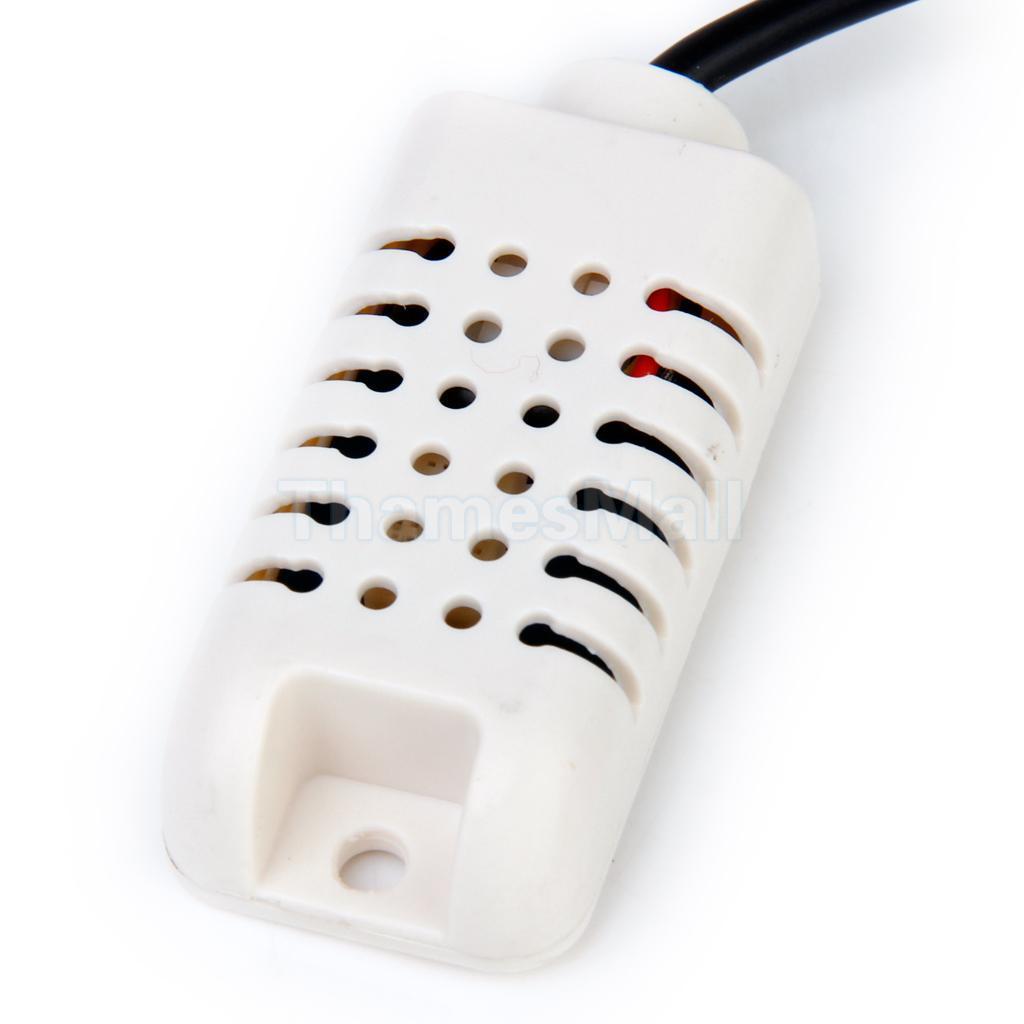
Short description of hygrostat: It looks the same as the thermostat wilhi wh7016C have same type LED display and butons. Diference is “only” sign is not yet celsius but in % relative humidity and probe is not NTC10K ,but is three wires capacitive probe (white plastic end) his type is AM2302 .
Navigation page:
UPDATE 24.8.2018
UPDATE 30.5.2016
Here are the pros and cons of MH-13001 humidity controller:
Here is pros
- Compatibile size with other similar temperature controllers ec. Wilhi 7016C
- Good visible red display with “set” and “working” LED indication
- Easy instrument control (explained later in post)
- Owns all the main functions that need good thermostat hysteresis, calibration, delayed start, and other ..
- Housing is good you can mout temperature controller in panel.
- Very good price 20 usd include shiping
Here is cons
- Muss calibrate this device , measurement humidity before calibration is bad (in some pieces) but after correcture +- 2-4% is MH 13001 reliable.
- For control with maximal precission under 1% is bad choice.
Price and buy
Humidity controller can buy from Ebay or AliExpress, good price varies around about 18-25 usd shipping included.Keep in mind that at low cost 20 usd sell MH-13001 is very cheap !
I recommend my favorite shop (seller) on Aliexpress for this humidity controller is Meter House has good price (about 20sud) with free shipping here is direct link for this product (220V 10A)
Recommended stores - dealers I bought a good MH-13001:
Detailed description of humidity controller MH13001 :
Now i will describe hygrostat (humidity controller ) and control , i will try to describe accurately.The device MH13001 include five main components:
- The display is red, it shows three “LED” digits,Clearly shows the temperature full value (no decimal place) .
- Below the display are Four buttons which control the humidity controller. First buton is “SET” with next two buttons are + and – are used for menu navigation increasing or decreasing values, and Rst is “ON/OFF button”
- On the back of the humidity controller 3x green terminals. In left is “Relay switch” , in center is “Power” and right is terminals for probe AM2302. (Later i descripted in schematick)
- The sensor for the Humidity controller MH-13001 is placed in bottom of temperature controller right side .It is about 80 cm long with active end.Type of temperature sensor is AM2302.
- Humidity controller MH-13001 can save the setings if no power source (blackout).
Be careful !!!!
1.) If you buy Humidity controller , take care when choosing a product, pay attention to probe buy only with one white probe stay away with similar grey probe (is bad choice)
2) If you connect the hygrostat must pay attention to the voltage label , Wrong voltage = burned-out thermostat
Choose right voltage version if you from United States (US) choose 110V , for European 220V,and 24V or 12V version.
Short guide how to connect Humidity controller MH-13001:
- For US (and other state) choose 110V version WH7016 Temperature controller
- For EU (european union) choose 220V (230V is OK) version WH7016 Temperature controller
- 12/24V can be AC or DC working good with both types of voltage.
Conection and terminals :
- Terminal 1 and 2: Normally open contact relay
- Terminals 3 and 4: 220V power connection
- Terminal 5,6 and 7: temperature sensor connection

Be carefull!!! :
Insert the probe properly - Red + 5V to "5" terminal , Yelow signal to "6"terminal, Black -5V to "7" terminal
And power to 3-4 terminals (do not connect to "sensor" terminal, hygrostat - burn!!!)
Load can be a humidifier or dehumidifier (muss add other device this product is only hygrostat)
Functions and settings of the hygrostat :
- 8.August 2018 manual Update MH13001 with alarm
At the beginning it is good to introduce humidity control for easy work. The MH-13001 has four control buttons on the SET, UP and DOWN,TURN ON/OFF.
Short press SET key you can set goal humidity (with arrows).
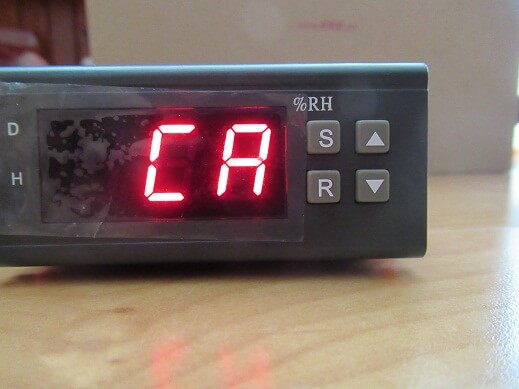
If you press the SET button for 2 seconds enters the menu with eight options for setting the humidity controller (HC,P7,CA,HS,LS,d,)
Function and codes:
| Menu code selection | ||||
| Symbol | Details | Setting range | Factory settings | Unit |
| HC | humidification or dehumidifying | H/C | C | |
| D | Hysteresis | 1 -- 15 | 5 | *C |
| LS | Lowest setting limits | -50 -- 110 | -50 | *C |
| HS | The maximum limit set | -50 -- 110 | 110 | *C |
| CA | Humidity correction | -5 -- 5 | 0 | *C |
| P7 | Delay time | 0 -- 10 | 1 | Min |
HC - humidification or dehumidifying
Dehumidification Mode: When the measured Humidity is higher than or equal to the set value + hysteresis, the relay picks up to start the output; When the measured Humidity below the set value, the relay off and close the output.
Humidification mode: When the measured Humidity is higher than or equal to the set value, the relay off, turn off the output; When the measured Humidity below the set value - hysteresis, the relay picks up to start the output.
Example for Setting: If it is set to Humidification mode, set the Humidity to 75%, hysteresis is set to 5, then when the measured Humidity is higher than or equal to 75%, the relay is off, close the output. When the temperature is below 70%, pick up the relay again, to start the output.
Example for Setting: If it is set to Dehumidification mode, set the Humidity to 75%, hysteresis is set to 5, then when the measured Humidity is below 75%, the relay is off, close the output. When the Humidity is higher than or equal to 80%, pick up the relay again, to start the output.
Humidification, Dehumidification mode setting: Press "SET" key and hold more than 2 seconds to enter the menu display, the screen appears "HC" code, press the "SET" key to display the working mode, press the "▲" or "▼" to adjust the display, C means Dehumidification mode; H means Humidification mode.
D - Hysteresis function
Hysteresis setting limits the maximum interval between the opening and stopping, this machine minimum interval between the opening and stopping is 1 %, the maximum is 15 %.
Hysteresis settings: Press "SET" key and hold more than 3 seconds to enter the menu display, with "▲" or "▼" key adjusted to the screen, appearing "D" code, press the "SET" key to display the hysteresis set value, press "▲ "Or"▼"key to adjust the parameters.
CA - Humidity calibration funtion
When there is deviation between the measuring Humidity and standard Humidity, use the Humidity calibration function, make the machine measurements value consistent with the standard Humidity, the after calibration Humidity = the before calibration Humidity + calibration value (calibration value can be positive number, negative number, and 0) .
Humidity calibration settings: Press "SET" key and hold more than 3 seconds to enter the menu display, with "▲" or "▼" key adjusted to the screen, appearing "CA" code, press the "SET" key to display the temperature calibration settings, press "▲ "Or"▼"key to adjust the parameters.
For example: When we measure the probe Humidity was 75 %,it displays 75% as the CA is 0, it displays 76% as the CA is 1, it displays 74 % as the CA is -1. This function is generally applied when the probe can not measure directly the measured object.
P7 Delay Protection Funtion
Set the device boot twice the shortest time interval
Delay Protection Setting: Press "SET" key and hold more than 3 seconds to enter the menu display, with "▲" or "▼" key adjusted to the screen, appearing "P7" code, press the "SET" key to display the delay setting value, then press the "▲ "or "▼"key to adjust the parameters.
HS and LS Upper and lower limit functions:
The setting of HS and LS limit the set range of control Humidity point ,
for example: HS is set to 75, LS is set to 50, the control Humidity can only be adjusted between 50 and 75, when the control Humidity to 50 then press "▼" key, the display will remain on the status of 50 and not decrease; when the control temperature to 75 then press "▲" key, the display will on the status of 75 and not increase. If the set point outside this range, it needs to firstly change the value of HS and LS, then it can be achieved.
Upper and lower limit settings: Press "SET" key and hold more than 3 seconds to enter the menu display, with "▲" or "▼" key adjusted to the screen, appearing "HS" or "LS" code, press the "SET" key to display the upper or lower limit set value, Then press "▲" or "▼" key to adjust the parameters.
HS means upper limit. LS means lower limit. For example: the upper and lower limits are used to limit the range of control temperature that can be set, such as: LS is 10, HS 20, then press the SET key to adjust the temperature control, it can only be varied between 10 and 20.
Humidity controller MH-13001 SECOND EDITION 2018/19 SET manual
I buy this humidity controller in 2018 and have has minor changes in the setup menu:
HC -choice between dehumidification (H) and humidification (C)

CP- hysteresis aka sleewing range

PU- time delay in minutes for compresor protect

CA-Calibration
HP- Humidity limit alarm this is the main difference compared to the previous version. Actual humidity - HP value trigger alarm for dehumidification , Actual humidity +HP value trigger alarm forhumidification.
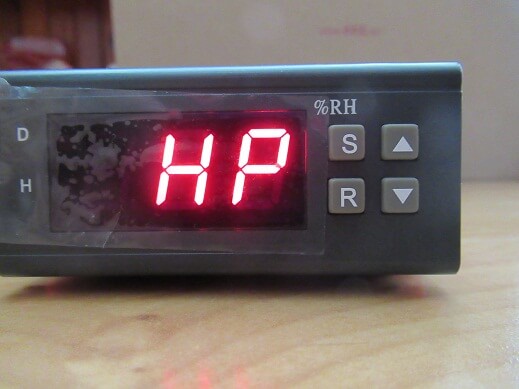
*HS and LS are removed from this version.
humidity controller mh13100_manual download
fault tips:
1)When the sensor disconnected, the screen displays --- and close the output
2)When the sensor detects the temperature is below 1%, the screen displays LLL
3)When the sensor detects a temperature higher than 99%, the screen displays HHH
Caution for using:
- the load must not exceed the output contact capacity, or it may result in machine damage and cause a fire. Various connecting wire must be
- well connected with the terminal, otherwise, it would result in reducing the reliability of machine. When connecting the wire, please separate power supply, relays, sensors, otherwise it will damage the machine.
Complete technical information for humidity controller MH-13001:

- Specifications:
- Working voltage: 220V ±10%
- Rated current: 10A
- power consumption: ≤3W
- Measurement range: 1% ~ 99% RH
- Measurement precision: 1% RH
- Measurement error: ±3% RH
- Control precision: 1% RH
- Working temperature: 0~70 Celsius degree
- Item size: 8.5 * 7.5 * 3.5cm / 3.4 * 3 * 1.4in
- Item weight: 203g / 7.2oz
- Package size: 10 * 8 * 6cm / 3.9 * 3.1 *1.6in
- Package weight: Approx. 235g / 8.3oz
NEW ZFX 13001 Humidity controller
- Model: ZFX-13001
- Working voltage: 12V, 24V, 110V, 220 V (optional)
- Output: 10A
- Measure range: 1%~99%RH
- Measure accuracy: ±1%RH
- Item size: 85 * 75 * 34.5mm / 3.35 * 2.95 * 1.36in


 diagram schematic , manual")


")
Thanks, I liked your review.
Many of these things for 110VAC or 220VAC use a swtiched mode power supply, and most of them create excessive radio frequency emissions (interference). It would be interesting to see an inside pic of the device and whether it uses a conventional iron cored transformer with linear regulator or a swithched mode power supply.
Yes, it uses a conventional iron cored transformer, bridge rectifier and a 5V regulator.
MH-13001 humidity controller
HT46R066B Holtek 8bit microcontroller
K24C02, 2K SERIAL EEPROM
TM1620 LED drive control circuit
power supply
SXM-012G 110V to 12VAC, 1.2A
MB6S bridge rectifier
470uF 25V capacitor
78M05 5V regulator
470uF 25V capacitor
humidity sensor
AM2001 VL4 is written on the pc board
STM8S003F3 8-bit microcontroller with 8K memory
Nice Ross ,can you send pics or video…schematic
Please kindly share the schematic diagram. Thank you.
Your functions and settings section appears to be for the temperature controller, not the humidity controller.
I bought the humidity controller, and have the one with the white sensor, as you recommend.
When I power it on, the humidity shows 93% , with a known ambient humidity of about 60%.
The calibration only allows me to reduce the unit by 20%, so I can only get it to 73%.
I have ordered a new sensor to see if that’s the problem.
I’m just posting this so others may know of my experience with this unit.
Cheers,
Mike
My new sensor arrived and tested, same results.
I then tested both the old and the new sensor connected through an Arduino Uno, and viewed temperature and humidity on my computer using the Arduino IDE. Both temperature and humidity read correctly, so the problem is obviously in my MH-13001 unit.
I will note that turning the unit off and back on can sometimes randomly change the readings. but they are never correct. Whether this is related to the bug you found I can’t tell, but I’m a bit disappointed in the performance of the unit.
Given you tested 10 units (which is much appreciated!), I am going to construct my own humidity controller using an Arduino as the base.
Thanks for your work.
Mike
October 11, 2016 at 11:45 am
i agree 100% with you mike
same happend with my new controller
i am disappointed too
I am having the same issue with the humidity controller. Did you ever finish your arduino humidity controller? I am considering the same arduino project… might be able to reuse some of the guts of the old mh-13001 controller.
Hi everyone! Thanks for the tutorial and all the useful thoughts!!!
My MH13001 unit reads 95 when humidity tested by other means shows 90 ( I was upset, but I shuoul be glad now reading all the comments, that readings are not that apart!). Then I calibrated to 90 using CA (-5) Function. By doing this, the unit will never reach readings over 95 of ambient temperature. If I set the limit to 96, the humidifier will never stop turning everything really wet. Be careful to use CA as any negative calibration seems to limit the uppper level of humidity detection but not humidity setting.
I also found out that if CA is set in negative values and you get a blackout, following readings will be very wrong. Try resetting and never use CA in negative values.
I bought your humidity controller, and had to get an electronic guy to put it together. But , when it was all put together and done, I do not understand how to set the controller.
Can you advise step by step, how to control the humidity between 55 – 60% RH???
Say step 1 : Press this button, step 2 ; press that button and so on
Thank you kindly
Howard Tan
Did you get any info on how to set this up?
Please see above comment. I only ask how to set the controller between RH55 to RH60
I don’t understand, and my controller. Which is this very one by the way. Has different codes. 5 to be exact. I can’t figure out how to set and calibrate this thing.
necesito saber cual es la polaridad de los bornes para conectar a 12 v,
de los bornes 3 y 4 cual ees el positivo y cual el negativo?. Gracias.
I need to know the polarity of the terminals to connect to 12V,
Of terminals 3 and 4 which is the positive and which is the negative ?. Thank you.
Muchisimas gracias por sus explicaciones
Attachment
A great hello from France, to a great man with a big heart Mr Ivan, thank you for all its shares, very useful for me, homemade cheese making I bought the MH13001 220V, I would like to install a 220V plug For power and a female plug for inserted a mini humidifier donuts USB 5V. I own the MH1210A installed live with the cables of the fridge, I do not understand the connection made to plug, can you guided me please? There are 3 wires (Brown – Blue – Green / Yellow) on each outlet. On the photo I numbered each element to be installed to facilitate my understanding, excused me for the errors because I use a translator and Thank you in advance to take care of this poor lost man, great respect for you.
Dont !! connect 220V (230V) to 5,6,7 terminals ..=burn temperature controller, (5,6,7 is for probe)
230v source voltage conect to terminal 3a4
Green yelow is safety wire ground (not conect , if you have metal case connect to metal case)
best regards
Attachment
According to my comprehension, I think the editing is as in this picture, but I’m not too sure, if you can confirm me? Thank you again and excused me for the derangement, thank you.
This is good schema , everything is connected properly 🙂
Attachment
Hello dear Ivan, it’s really fantastic, you are a genius, you made me happy, I wish you happiness, thank you for my heart for all this sharing, a very great respect for you, super nice.
thanks … i help I am glad to help–
If you can post photo of your device … for interest
Thank you Ivan, excuse me for the photo upside down, it works for now, the humidity is well regulated, I notice a beug, I set the controller in H mode = Humidifier, puts on 60% RH, relay This trigger at the top 🙂 as if set on dehumidifier, when I set the mode C the relay works below 60% HR requested 🙂 I think the manufacturer reversed the modes, or can be me who does not understand Well, but in the end his walk so excellent, you are a genius, thank you.
Attachment
Hello from France Ivan, I bring you respect and wish you happiness. Thanks to your help, here are the final photos (not yet tried)
thank for photos
Attachment
Hello Ivan, I hope that all goes well for you, thanks to your help I finally realize the mounting of the MH1210A and MH13001 thank you infinitely, I would have a small question of amateur, for the controller humidify MH13001 ‘uses a mini USB humidifier I wanted to know if I can use a dual outlet in the MH13001 plug to add a 220V to 12V adapter use 2 small PC fan? when the humidifier is activated the fans will also activate? thank you in advance, my respect.
Hm if you fan have 240V voltage can you use for this .. but if have 12V voltage you muss use 240V/12V transfomer – power supply ..
my answer is YES
Thank you very much Ivan you are really great, yes I will use a 12V 220V adapter for fans and a 5V 220V adapter for the mini humidifier, I wish you a very good week end thank you.
I’m having issues wiring this unit I’ve tried using diagram above and it’s not producing power to humidity, MH13001 is receiving power , please help
Hi gleen
MH13001 not give power on relay
Youm mus give phase wire to relay contact A , from relay contact B wire plug to humidity producer ..second contact from humidity producer connect to neutral wire
Hi Ivan
My MH-13001 is marked 12VDC does it matter which way those power leads go onto terminals 3&4
it simply says power
Thanks in advance
many thanks
Patrick
I have two mh13001 the codes are only 5 which are HC.CP.PU.CH AND.HP I have them for 12 volt backup . I have two others SVWL 8040 and they have HS and LS .
CAN YOU HELP THANKS .
Attachment
It appeared after the power was turned off. What does it mean?
Please kindly share your schematic diagram. Thank you so much for your work.
Thanks for this report. Very useful.
Just a few details: The link to User Manual is not the correct document.
Also, I got the 12Vdc version and experimented that the +12V connector is the fourth pin(4)
counting from Left (front view)
-12V would be the fifth pin(5). In case someone is seeking this info.
I really don’t understand. My MH 13001 is how to adjust the humidity of the upper and lower limits
hi what do the lights on the left hand side mean ?
it on a MH-13001