In this article you will read a review of a SHT-2000 combined temperature controller with a humidity controller that can control both humidity and temperature at the same time ,can see and download manual ,wiring conections and more useful info.
Here are the pros and cons of SHT-2000 temperature humidity controller:
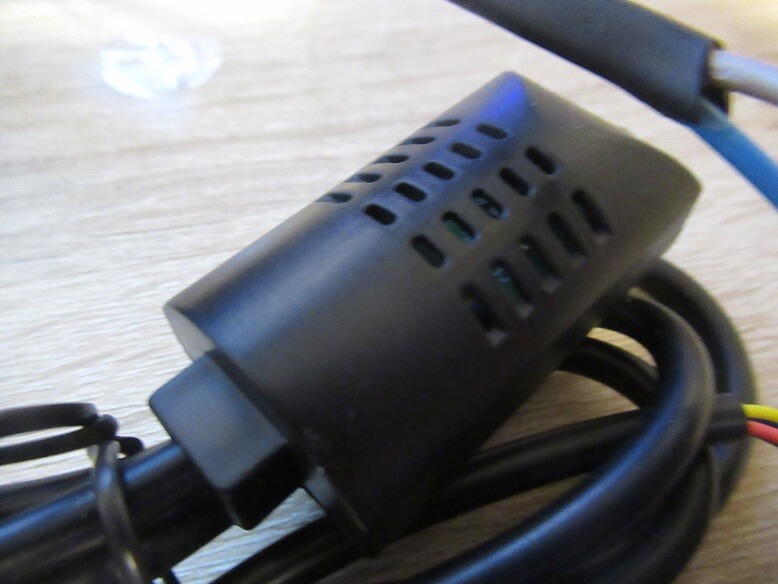
SHT21 temperature and humidity probe for SHT2000 controller
First, I start with negative features The thermostat responds more slowly than the 1210W model or other NTC 10K probe.this is caused by the SHT21 Probe temperature sensor is inside the plastic sensor and it takes some time until the temperature changes. Control range is smaler comparison with 1210w temperature controler. Setup is also difirent no have menus – HC ,P7,HS,LS, temperature and humidity settings are the same as XY-WTH1 .
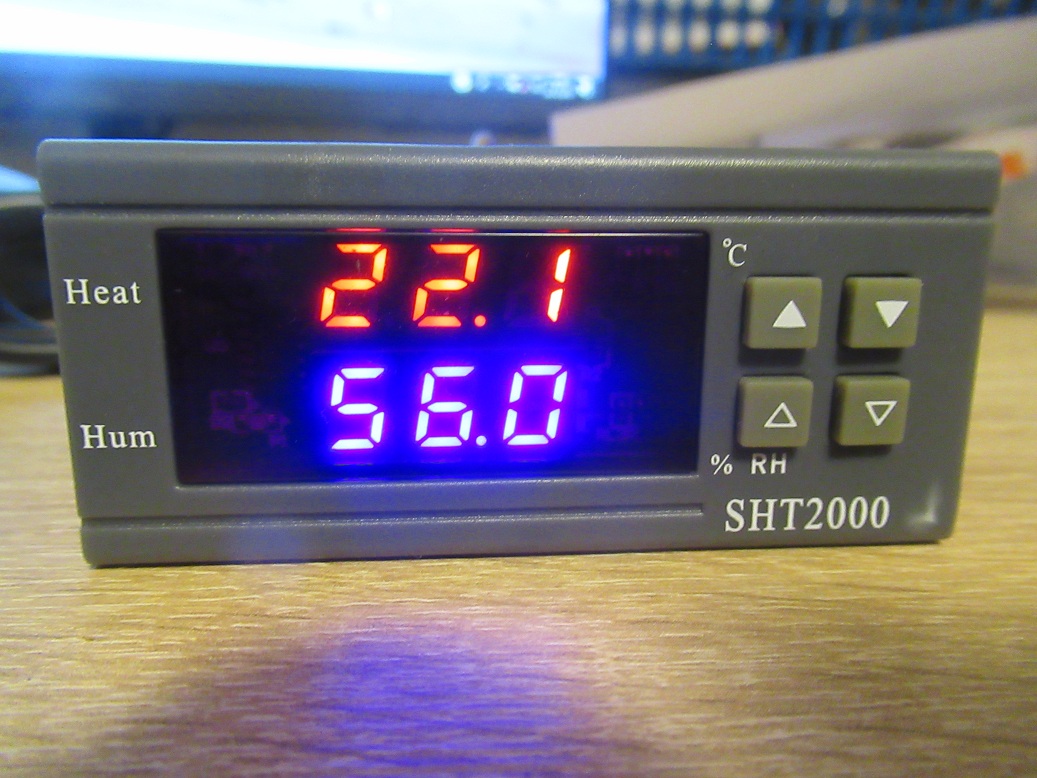
Positive qualities for SHT 2000 are color-coded temperature humidity on display,Precise Moisture Measurement after stabilization, the temperature is accurate.
Manual SHT 2000 temperature controller
Complete video manual with setings for humidifing/dehumidifing – heating/cooling and Calibration:
Wirring diagram manual :
Setting method: Start value <stop value (program automatically determines working mode is heating/humidifying mode)
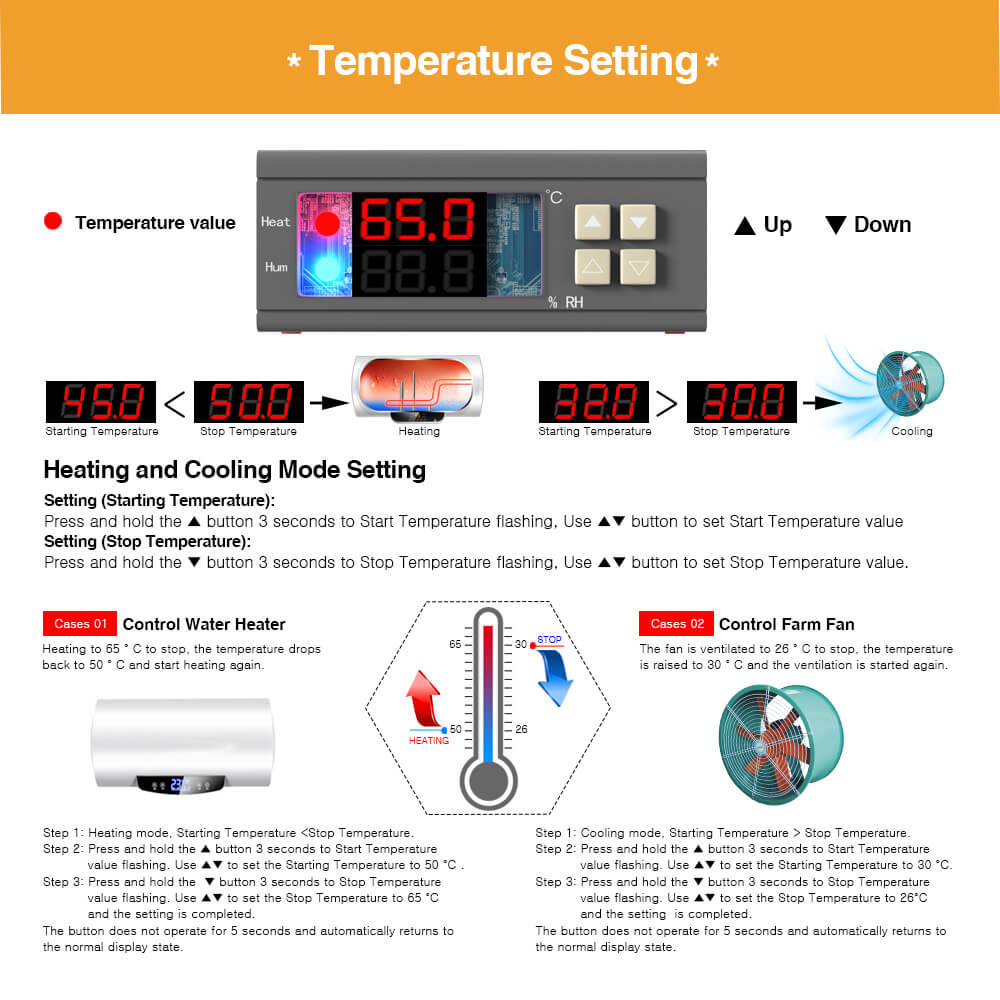
Heating/cooling mode setting
Setting mode: setting (starting temperature): Press and hold the ▲ button to start the temperature flashing. Use ▲▼ key to set the starting temperature value.
Setting (stop temperature): Press and hold the ▼ button to stop the temperature flashing. Use ▲▼ to set the stop temperature value.
Heating use case: control the water heater, heat to 65 ° C to stop, the temperature drops back to 50 ° C and start heating again
The first step: heating mode, starting temperature <stop temperature Step 2: Press and hold the ▲ button to start the temperature flashing. Use ▲▼ to set the starting temperature to 50 °C. Step 3: Press and hold the ▼ button to stop the temperature flashing. Set the stop temperature to 65 °C with ▲▼ keys, and the setting is completed!
Refrigeration use case: use in the farm, the fan is ventilated to 26 ° C to stop, the temperature is raised to 30 ° C and the ventilation is started again. Step 2: Press and hold the ▲ button to start the temperature flashing. Use ▲▼ to set the starting temperature to 30 °C. The third step: long press the ▼ button to stop the temperature flashing, set the stop temperature to 26 °C by ▲▼, the setting is completed!
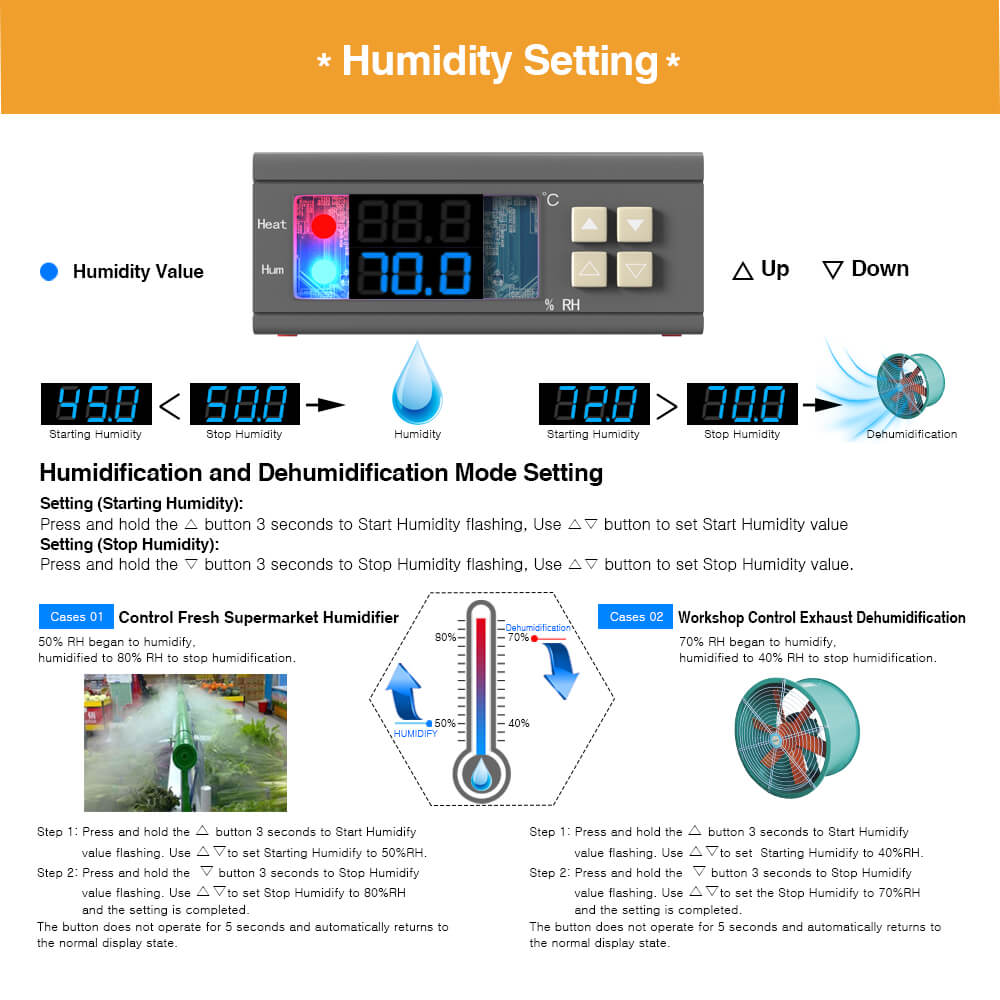
Humidification/Dehumidification Mode Settings: Setting (start humidity): Press and hold △ key to start the humidity value flashing. Set the humidity value by △ ▽ key. Set [Stop Humidity]: Press and hold △ key to stop the humidity value flashing, and set the humidity to stop by △ ▽ key value.
Humidification
example: fresh supermarket humidification, control humidifier 50% RH began to humidify, humidified to 80% RH to stop humidification. Setup steps: Step 1: Press and hold the △ button for 3 seconds to start the humidity value flashing, and set the starting humidity value to 50% RH.
Step 2: Press and hold the ▽ button for 3 seconds to stop the humidity value flashing. Set the value to 80% RH. After the setting is completed, the button will be operated for 5 seconds without returning to the normal display state.
Step 1: Press and hold the △ button for 3 seconds to start the humidity value flashing, and set the starting humidity value to 40% RH. Step 2: Press and hold the ▽ button for 3 seconds to stop the humidity value flashing, set the value to 70% RH, the setting is completed, the button does not operate for 5 seconds, and automatically returns to the normal display state.
Technical Parameters:
Supply power : AC 110-230V
Relay control output: 10A (1xtemperature 1x humidity)
Humidity control range: 0-100%
Temperature control range: -20°C +60°C
Acurracy: +-0.3°C and +-3%
Dimensions:75x85x35mm
Package include:
1x AC 110~230V 10A SHT2000 Temperature and Humidity Controller
15 thoughts on “SHT-2000 Temperature humidity controller 110V/230V buy and manual guide”
Hello sir, I am from India. I am creating an incubator for 60 to 120 eggs capacity by myself using video on sht2000 digital hygrometer. I got information on how to connect wiring of heating system and humidifier device. I require an information on how to connect wiring for 12v Dc fan for circulation of air in the box-incubator. Please help me or share any video on this.
Relay switch output is as switch simmilar … he make only on off circuit.. connect plus wire to relay “one” terminal , from realy “two” terminal connect to fan (+ pole) , minus pole from fan conect directly to – minus pole


 Technical Parameters:
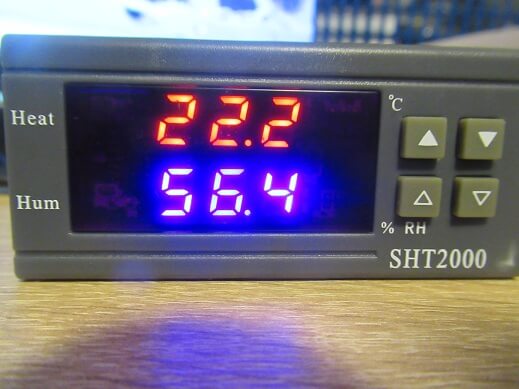


 diagram schematic , manual")
Hello sir, I am from India. I am creating an incubator for 60 to 120 eggs capacity by myself using video on sht2000 digital hygrometer. I got information on how to connect wiring of heating system and humidifier device. I require an information on how to connect wiring for 12v Dc fan for circulation of air in the box-incubator. Please help me or share any video on this.
Thanks and regards
Senthilkumar
Relay switch output is as switch simmilar … he make only on off circuit.. connect plus wire to relay “one” terminal , from realy “two” terminal connect to fan (+ pole) , minus pole from fan conect directly to – minus pole
Hi. I m nik. Can u help me. How to wiring sht2000 dc12v.
Hi nik wirring STC3008 is very simmlar as AC 230V version , not depend on polarity this is good, can you tell what you build ?
Hello
Where can I buy only a 2000 SH sensor?
yes in article has name
My SHT2000 controller has been working well however my temperature reading Changed to “LLL”. What does this mean and how can it be corrected?
My Humidifier has a Voltage of 220~240V, i’m guessing the sht2000 wouldn’t work, right?
hye, may i know can this controller be tune? and how to know how many value drop after reach a set point?
Hi use start temperature and stop temperature with this values can you manage hysterezy gap (or drop)
okay thank you for your respond. may i know also. can this controller control the temperature up to 70 celcius?
no cant 70celsiu Temperature control range: -20°C +60°C
okay. buy why in the picture above show it set up until to 65celcius?
Hi,
nice article, do you know of any enclosure for the controller?
Hey can this incubator be connected to the solar system if you don’t have the power grid